
Products Used
- Renshaw Royal Icing
- Fondant Icing: Red, Green, and Bright Green
- Rainbow Dust ProGel: Green and Green
- Rainbow Dust Metallic Paint: Pearlescent Spring Green
- Edible Glitter/Sanding Sugar: Optional
The festive season is upon us once more, so before you go out and buy even more Christmas decorations this year, why not try creating your very own!
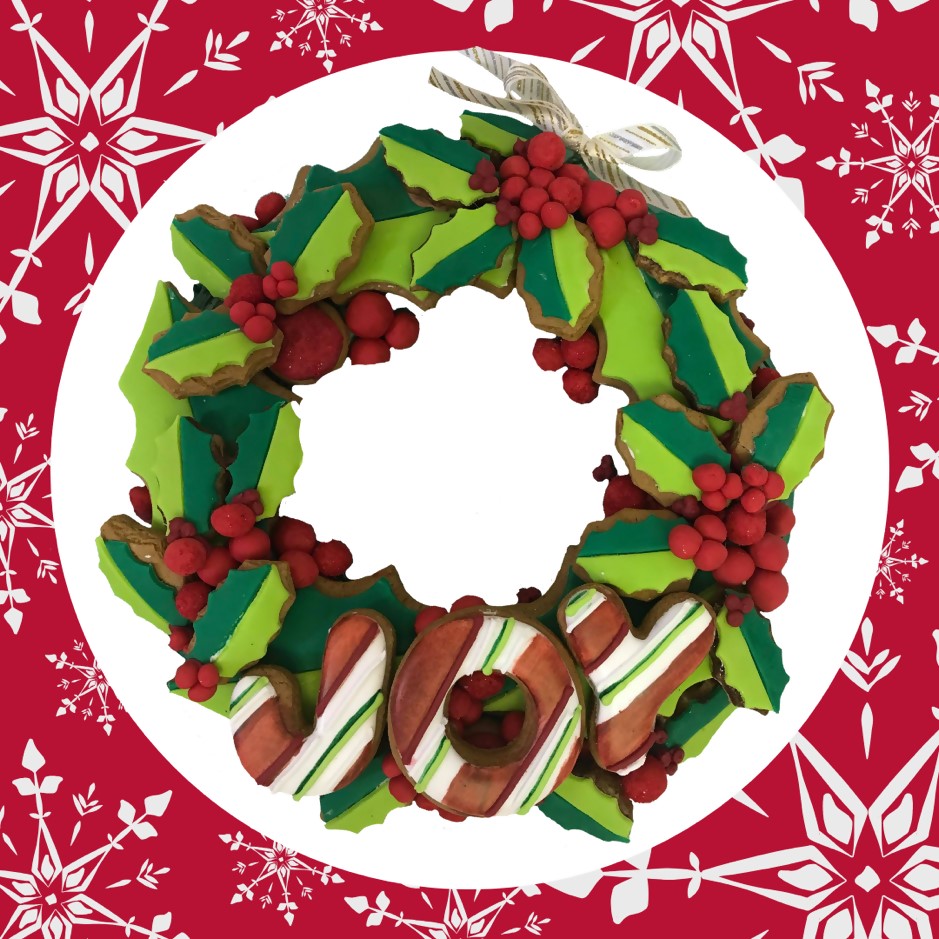
A classic choice of holiday décor with endless design ideas, our Christmas Cookies Wreath, created by the wonderful Reva Alexander Hawk from Merci Beaucoup Cakes, is super fun and easy to make—plus the best part…it’s edible!
To begin, prepare your favorite cookie dough and roll to about 1/8 of an inch in thickness.
Then to create the cookie base, hand cut an 8-inch circle (using a cake circle as your guide), and using a round cutter, cut the center to create a wreath, placing it onto a baking sheet and baking as directed.
Next cut out holly shapes, 5 to 6 large and 24 small and then cut at least 6 small rounds for berries (you can use as many or a few of these as you wish, these numbers are just a guideline). Then transfer to baking sheets and again bake according to your directions.
For your holiday message, cut out the letters “J,” “O,” and “Y.” (If you make your wreath larger, you can have a longer message.) Don’t forget after baking to allow the cookies to fully cool before decorating or if you have time prepare your cookies the night before.
Now for the decorating! First start by preparing you cookie wreath base with Renshaw Royal Icing and set aside to firm up. Then using the Renshaw Ready to Roll Icing in the shades Green and Bright Green, roll out and create holly leaf shapes, halving each leaf lengthwise to create a two-toned design.
After that, attach the cut leaves to the correct-size cookies using Royal Icing (use the same color icing as the leaves, by adding some Green Rainbow Dust ProGel to a separate bowl of your icing) and smooth out any seams where the two colors meet.
Now for the large berries, blend the Rainbow Dust Red ProGel in a separate bowl of your Royal Icing until you achieve your desired color. Then place into a piping bag and pipe a large dot on top of your small round cookie bases. Then using the Red Ready to Roll Fondant, roll out little balls to be used as berries, creating various sizes and set aside (if you plan to hang your wreath now is the time to cut a pretty ribbon and tie it around your cookie base).
Next using the Green Ready to Roll Fondant, roll out a circle big enough to cover the wreath, about 10 inches to 12 inches in diameter and about 1/4 of an inch thick. Then place it on top of the iced cookie wreath base, allowing for the ribbon to easily stick out the top of the wreath. If the Royal Icing is completely set up, then you may need to use piping gel or edible glue to make sure that the fondant is properly attached. Make sure to trim and smooth the sides with a plastic scraper.
Then using the Rainbow Dust Edible Metallic Paint in Pearlescent Spring Green, paint the fondant-covered wreath base, adding texture with a sugar tool or fork. Once dry, using the green-colored Royal Icing, attach the holly leaves to the wreath. Then using the red-colored Royal Icing, attach the berries (you can use some edible glitter or sanding sugar to create different textures on your berries).
Once your letter cookies have dried or have a firm surface (about 4 hours of drying), using Rainbow Dust ProGels and some lemon extract, paint details onto your cookies.
Finally attach the letter cookies to the wreath using Royal Icing and let dry completely before hanging or gifting to a loved one or friend!
For more information on the products used and mentioned, please visit
https://www.renshawamericas.com/products/
