
Thanksgiving Cornucopia
by Teresa Culletto
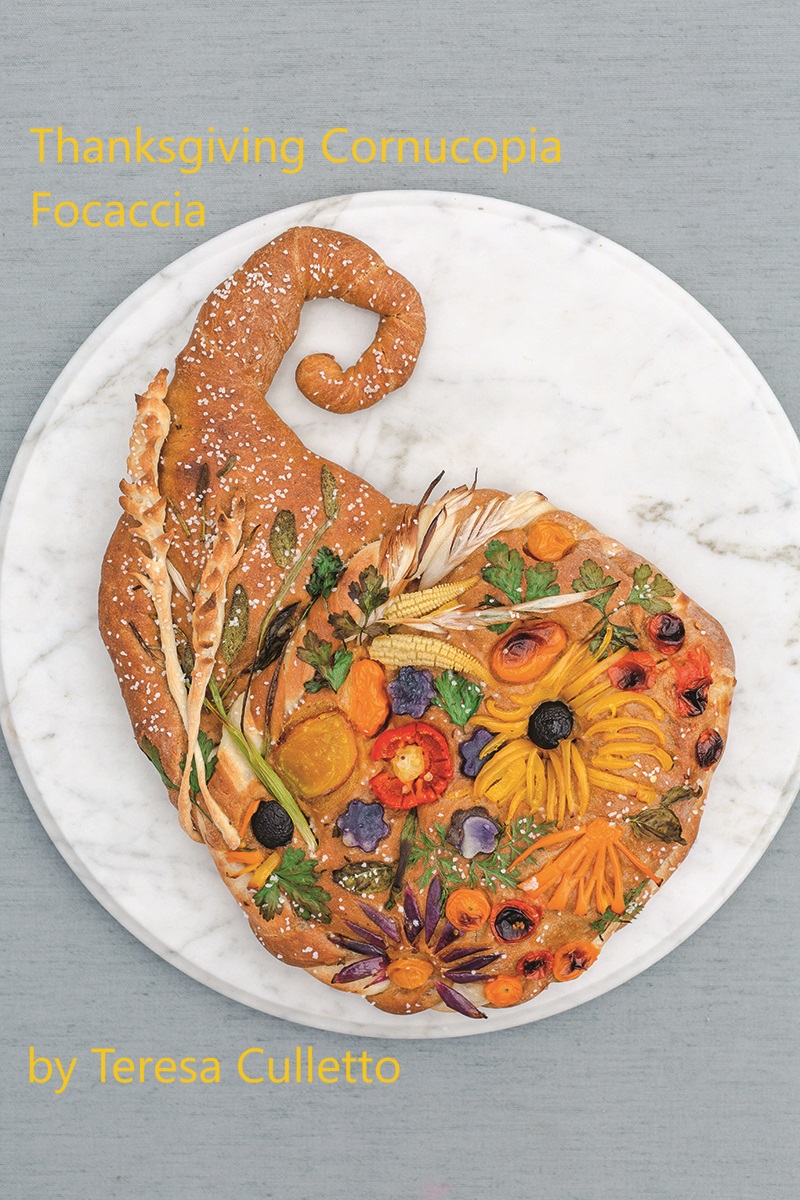
This attractive focaccia filled with colorful vegetables and flowers will complement any fall feast.
Ingredients
1 recipe for Basic White Focaccia or Basic Whole Wheat Focaccia
3 tablespoons extra-virgin olive or neutral oil, divided
1 teaspoon lemon juice
Bowl of ice water
4 leaves sage
6 leaves basil
4 sprigs parsley
1 red mini sweet pepper
2 yellow mini sweet peppers
2 orange mini sweet peppers
1 small red onion
4 grape tomatoes
1 pitted black olive
2 baby corns
1 mini purple potato
1 small leek
1 scallion (about 7 inches, or 18 cm, long)
Flour, for dusting
Finishing salt, to taste (optional)
Instructions
Dough Preparation
1. Prepare the dough according to the recipe instructions to the point of its second rise.
Vegetable Preparation
1. Prepare two pieces of parchment about the size of your intended focaccia and lay them on two 18 x 13-inch (46 x 33 cm) baking sheets. Coat the parchment on one of the sheets with 1 tablespoon of the oil.
2. Add the lemon juice to the bowl of ice water to keep the greens bright. Place the sage, basil, and parsley in the ice water.
3. Cut out flower petals from one each of the yellow and orange mini peppers and from the red onion. Create a splayed flower from the red mini pepper, then place in the ice water to help it open up more.
4. Slice the grape tomatoes in half and place, seed sides down, on a paper towel to drain any excess liquid. Pat the olive dry. Cut the olive and the baby corn in half lengthwise.
5. Cut out 4 or 5 flowers with the cookie cutter from the purple potato.
6. Make a shallow, lengthwise slit down one side of the leek, then peel off and discard the outer layer. Carefully separate out 3 or 4 layers and wash under cold running water to remove dirt and sand. Make a feather shape about 4 inches (10 cm) long and make slits on each side of each layer for fringed edges.
7. Slice the scallion lengthwise into a few layers, leaving the bottom intact.
8. Move all the vegetables to the unoiled baking sheet, keeping things separate and organized by color and sizes for ease of use during the decorating process. Remove the greens from the ice water and dry them well before placing on the baking sheet.
Oven Preparation
Thirty minutes prior to baking, move the oven rack to the middle and preheat the oven to 450°F (230°C; gas mark 8), allowing time for the oven to come to full temperature.
Shaping
1.Cut off a golf ball–size piece of dough and set aside. Shape the larger piece of dough while dimpling it into a cornucopia shape. It’s easiest to make this shape by placing the parchment with the dough directly on the work surface. Start by shaping it into a 12 x 8-inch (30 x 20 cm) rectangle. Take the top-left corner of the dough and begin to twist, pulling outward at the same time. Squeeze toward the center with both hands, narrowing the shape a bit to look like a horn. Twist up the tail piece into a curl at the narrow end. This will give the effect of a twisted-horn cornucopia, leaving
an oval about 10 inches (25 cm) in size to place the decorations on. If the dough is springing back, allow it to rest for 5 to 8 minutes. The dough will be supple and ready for shaping again.
2. Using your hands, roll the smaller piece of reserved dough into a 24-inch-long (61 cm) rope, or until the strand is about 1/4 inch (6 mm) thick. Cut off two 4-inch (10 cm) pieces from the rope and set aside. With the remaining piece, fold it in half and twist it about 8 times to give it a braid-like look. Spritz with water and place along the top of the oval. Pinch in the ends under the flattened cornucopia dough to give definition to the opening of the cornucopia.
3. With the two 4-inch (10 cm) pieces, create wheat stalks. Roll them slightly to taper each end, then using kitchen scissors, snip little notches at the tops and along both sides, about 1 inch (2.5 cm) down the stem. Spritz the dough stalks with water, then lay them on the cornucopia.
4. Coat the dough with the remaining 2 tablespoons oil.
Decorating
1. Place the parchment and shaped dough back on the baking sheet. Turn the baking sheet so that the oval is closest to you. The decorations will be tightly placed and slightly overlapping.
2. Place an olive half on the right side of the oval and surround it with yellow pepper petals to make a flower.
3. On the bottom-left side, create a flower with a tomato center surrounded by red onion petals.
4. Make a partial or whole flower with the orange pepper petals on the bottom center, depending on the space. Use an olive half for the center of a whole flower.
5. Place the parsley and basil all over the oval.
6. Place the feathered leek along the top right of the oval and add the baby corn halves.
7. Lay the scallion above the braid with its stem going down into the cornucopia opening. Spread the layers out across the horn, then place the sage leaves along one of the scallion layers.
8. Fill the remaining space with potato flowers and tomato halves.
9. Allow the focaccia to rest for 10 to 15 minutes in a warm, draft-free place after decorating. The shape should puff up nicely. Survey the surface and deflate any large air bubbles with a toothpick or skewer, leaving smaller ones intact (docking). Using piano-style finger motions, gently dimple the dough again. Ultimately, you want to see an uneven bubbly texture, about 1 1/2 to 2 inches (4 to 5 cm) thick in various spots. If the focaccia is flat, allow it to rest for 8 to 10 minutes in a warm, draft-free place.
Baking
1. Just before placing your focaccia in the oven, check the decorations to be sure they are all snug. Secure any that look to be popping off, using a chopstick, skewer, or your fingers.
2. Add finishing salt (if using) and place the focaccia on the middle rack of the oven.
3. Bake for 8 minutes at 450°F (230°C; gas mark 8). Reduce the heat to 375°F
(190°C; gas mark 5) and check the decorations again. If any are popping off, coerce them back into the dough by gently and carefully poking down. You don’t want to burn yourself. Bake for 10 to 16 more minutes, until the focaccia is golden brown and crisp on the edges.
4. Remove from the oven and let cool for at least 5 to 10 minutes before cutting.

Excerpted from Beautiful Bread: Create & Bake Artful Masterpieces for Any Occasion by Theresa Culletto. Copyright 2023. Published with permission from Rock Point.
